Sew Simple Burp Clothes
Materials:
Dish Towel
Duck Cloth / Canvas Fabric
Bias Tape
Cotton Batting
Instructions:
1) make a template that measures 10 1/2 inches x 20 inches
(I like to use a paper grocery bag to make my templates)
2) round the edges
(I fold my template in half and then in half again so all edges are cut the same and at one time)
3) Trace and Cut the template onto the dish towel, duck cloth, and cotton batting using a fabric marker
4) sew the duck cloth and the cotton batting together along the raw edges with the right side of the duck cloth facing up
5) now sew the duck cloth / cotton batting to the dish towel along the raw edges with both right sides facing out
6) sew a line across the burp cloth at 6 inches and 14 inches. This will help stabilize the cotton batting.
7) sew the bias tape around the edges
8) Done
Also keep in mind, if you don't have a little one at your home, this burp cloth makes a wonderful and functional baby shower gift.
____________________________________________________________________________________
A Quick and Easy Accessory
Directions for Crochet Flower:
Foundation ring- ch8 and join with sl st to form a ring
Round 1: ch6 (count as 1 dc, ch3), [1dc into ring, ch3] 7 times, join with sl st
Round 2: *[1sc, ch2, 3dc, ch2, 1sc] all into the same space, ch3; rep from * 7 times, do not join
Round 3: *ch5, working behind petals, skip the petal and join with 1sc into the 3ch loop beside the petal; rep from * to the end, do not join
Round 4: *[1sc, ch2, 5dc, ch2, 1sc] all into the same space, ch5; rep from* to end, do not join
Round 5: *ch7, working behind petals, skip the petal and join with 1sc in the the 5ch loop beside the petal; rep from * to end, do not join
Round 6: *[1sc, ch2, 7dc, ch2, 1sc] into the same space, ch 7; rep from * to end, do not join
Round 7: working behind the petals, join yarn
Now you have your flower complete
If given time to plan ahead, the ideas of how you can decorate and accessorize with the crochet flower are endless.
________________________________________________________
Pin Cushion and Thread Storage
_________________________________________
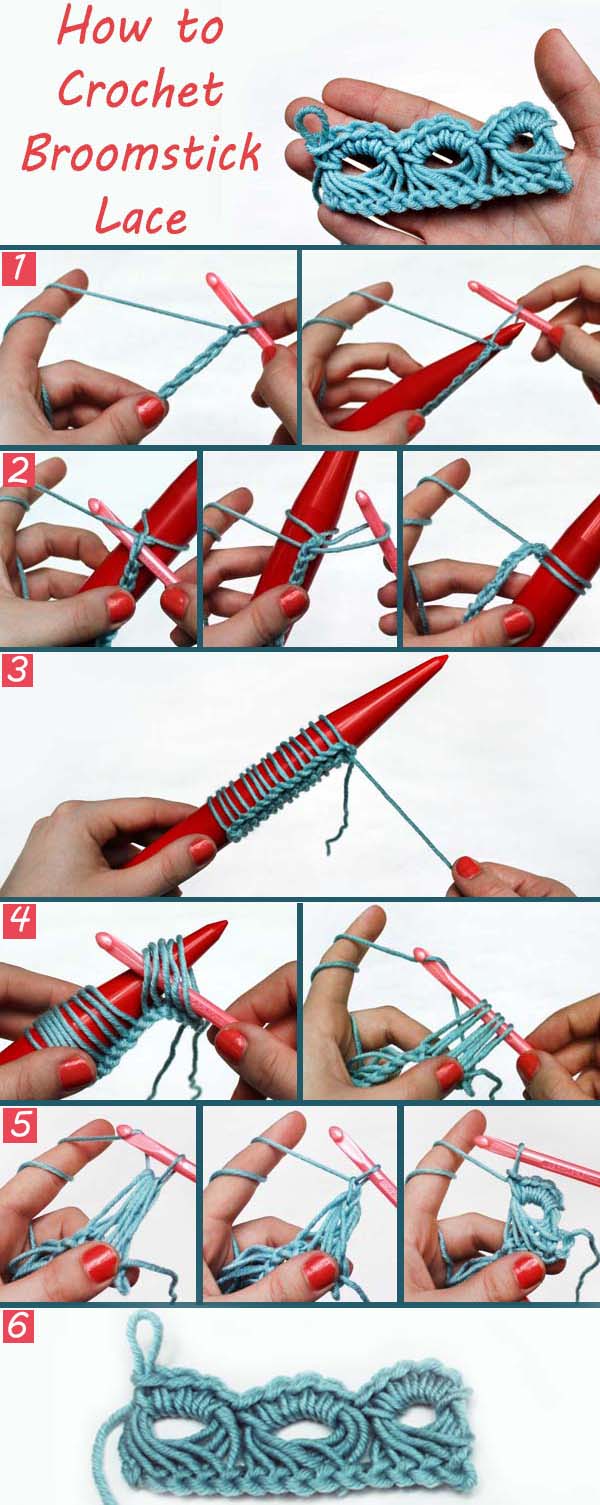
Broomstick Lace How to Courtesy of blog.LionBrand.com
Broomstick lace has a beautiful, open look that really shows off the character and texture of your yarn. Dating back to the 1800s, this technique creates large loops of yarn that gently twist to the left, giving the finished project especially elegant drape. For a long time I was intimidated by broomstick lace, so I wanted to share how easy it is to create this beautiful, reversible fabric!
Ready to get started? You’ll need:
- Yarn for your project: Choose a yarn you want to show off. I chose Martha Stewart Crafts Extra Soft Wool Blend because I love the twist and soft luster.
- Crochet hook: Use whatever hook you feel works best with your yarn. I used a US K10.5/6.5mm hook for larger, more open stitches.
- Large knitting needle (or actual broomstick, if you dare!): You can use any large needle for this project; the larger your needle, the larger your loops will be. I used a needle from a pair of ‘Speed Stix’ (US 50/25mm). When making broomstick lace, this tool is often called the “pin.”

1. First, make a chain. For this sample I wanted to make repeats of 5, so I chained 15 stitches for 3 repeats. Draw the final chain up over the knitting needle.
2. Crochet back into the chain, drawing up a loop in each stitch and pulling it up over the knitting needle.
3. Repeat until you have drawn up a loop through every stitch in your chain and transferred them onto the knitting needle. This step creates the large loops of yarn you will see in the finished lace.
4. Slide your hook through the first group of loops (for this example that’s 5 loops per repeat) and pull them off the needle. At this point, if it is easier for you to manage, you can remove the large needle from your work altogether.
5. Yarn over and pull through the group of large loops on your hook. Work one single crochet for every loop in the group on your hook (I worked 5 single crochet into the group of 5 loops). Continue this process until all the loops have been crocheted into. Note: make sure to check how many loops you have in each group to avoid accidental increases or decreases.
6. This completes your first row of broomstick lace! You can now draw loops up through each of the single crochet stitches you made in step 5, and continue to repeat steps 1-5 till your project reaches the desired length.


No comments:
Post a Comment